

 It is important to properly grout your tiles so the grout will dry hard and durable with an even looking color.
By Troy Cantini
Applying grout between the tiles is usually the final step in a tile installation. A good looking grouting job can enhance the look of a tile installation. A sloppy or improper grouting procedure can ruin the look of a tile installation. Many mistakes involved in grouting tiles can not be repaired so it is important to apply the grout correctly.
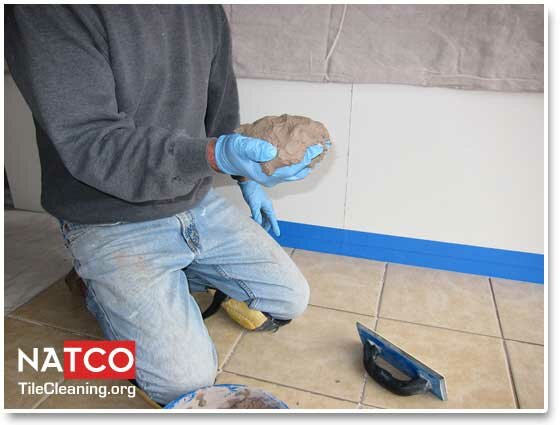
You should have all of your grouting tools and supplies on hand and ready to go before you start grouting your tiles. You do not want to be forced to take time out looking for grouting supplies in the middle of your grouting procedure. When grouting your tiles it is important that all required steps in applying the grout and cleaning up the grout and grout haze be done in a timely manner. Allowing the grout to set improperly or not cleaning up the grout haze on the surface of the tiles in a timely manner can ruin your grouting job.
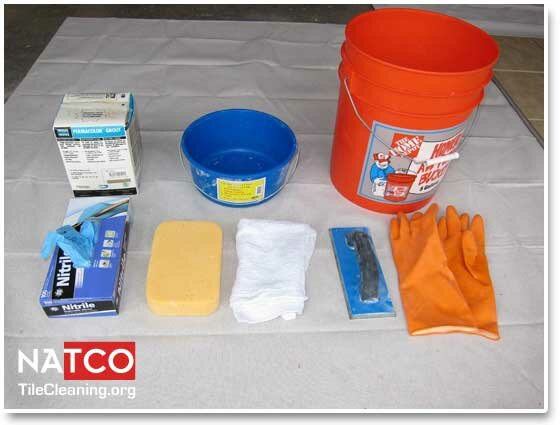
Supplies needed for grouting:
-
Cement based grout
-
Open face bucket to mix the grout
-
Grout float
-
Grout sponge for cleaning up excess grout off of the tiles
-
Bucket of clean cool water
-
Vinyl or rubber gloves to keep grout off of your hands
-
Cheese cloth or terry towels to remove the grout haze
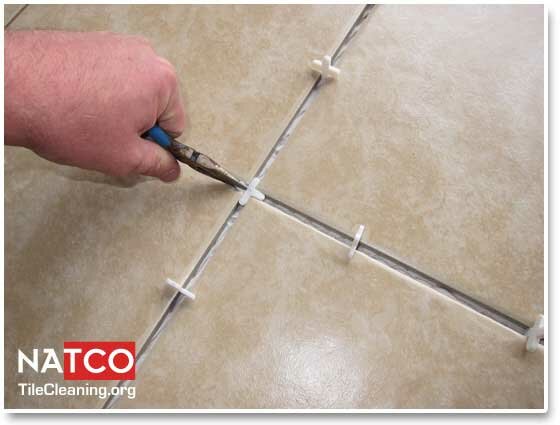
One common mistakes people make before grouting their tiles is to leave spacers between the tiles prior to grouting them. You should always remove all spacers between the tiles prior to grouting. Do not think that you can just grout over tile spacers. Grouted over spacers can cause the grout to crack and break apart above the spacers. Also the spacers will cause the grout above them to be thin and weak and over time the spacers may show through this thin layer of grout. A pair of needle nose plier can be used to remove the tile spacers.
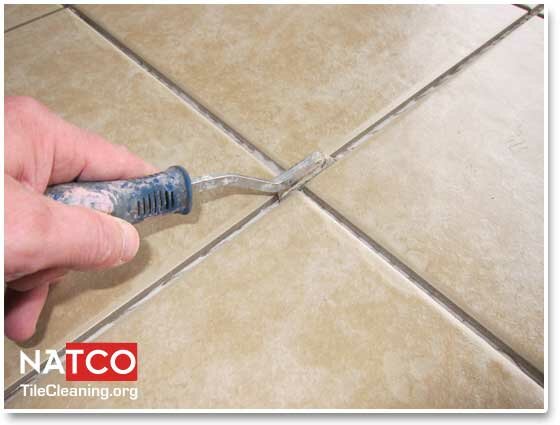
Another common mistake people make prior to grouting is to leave high areas of thinset between the tiles. High areas of thinset between the tiles will show through the grout after you are done grouting. Many people mistakenly think that these areas of thinset will be covered with grout but find out too late that the thinset is popping out through the grout. You should scrape away and knock down all areas of thinset that are over half the height of the edge of the tiles. A grout grinder tool or grout grinder tool works great to grind down these high areas of thinset.
When choosing a grout you should always choose a cement based grout that mixes with water. Never use any type of premixed grout. Premixed grouts are vastly inferior in many ways to standard cement based grouts. You should also use the correct type of sanded or unsanded grout for your particular tile installation. Both sanded and unsanded grouts have their specific uses in different types of tile installations. For larger grout lines lines over 1/8 inch in tile floors it is always better to use sanded grout.
Properly mixing the grout with water is an extremely important step in the grouting procedure. A common mistake many DIY grouters make is to mix the grout with too much water. There are many problems associated with mixing the grout with too much water. The grout color can become faded and blotchy or the grout can be weakened and start to break apart in the grout lines. You should mix the grout so that you are able to hold the grout in your hand without the grout oozing out between your fingers.
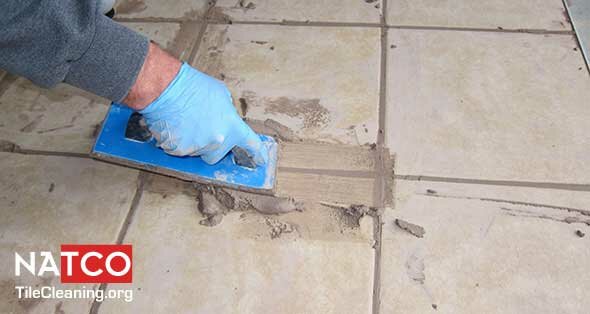
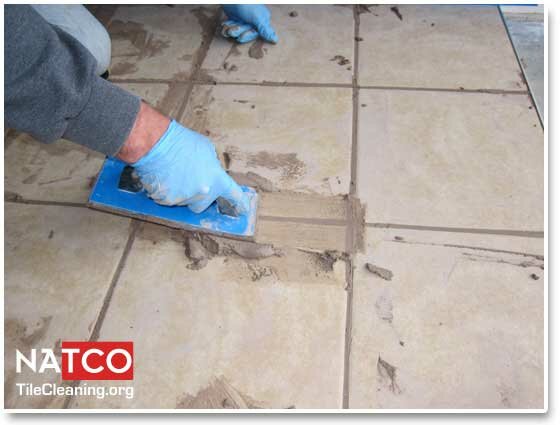
You should use a grout float to force the grout deep into the grout lines. You do not want to just smear the grout across the top of the grout lines and hope that the grout lines get filled with grout. Taking the time to force the grout deep into each individual grout line will ensure that there are no thin areas of grout that could break through or chip out of the grout lines.
The next step in the grouting procedure is to clean up the excess grout with a damp sponge. You should only apply the grout to small areas of tile before cleaning up the excess grout with the damp sponge. You do not want the grout to dry and harden on the tile surfaces before cleaning the excess grout with the damp sponge. You should wring out as much water as possible from your damp sponge before wiping off your tile surfaces. Too much water in your sponge while wiping off the tiles can weaken the grout and cause the colored pigments in the grout to get washed away.
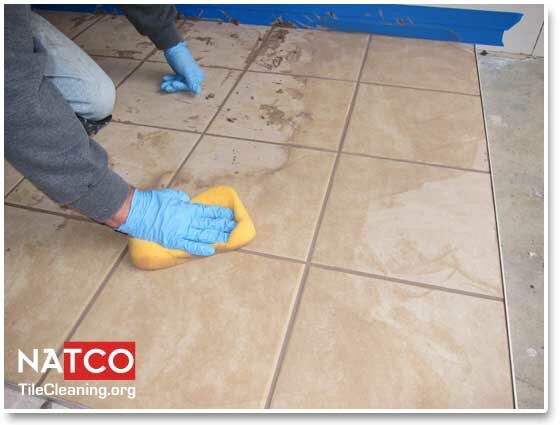
You should only clean up a small area of tiles with the grout sponge before rinsing and wringing out your grout sponge and moving on to the next section of tiles. You will use the grout sponge to form nice evenly looking grout line. After you have cleaned up a small section of grout then turn your sponge over and wipe another section of the tile and grout. You will only typically be able to wipe 2 or 3 tiles before your sponge will become filled with grout and you will have to rinse and wring out your sponge out in the bucket of water.
After you have cleaned all of the grout with the grout sponge and tooled the grout lines then allow the grout to dry for 1-2 hours before cleaning up the grout haze. You will see this grout haze form on the tile surfaces after about 20 minutes when the tile surfaces start to dry. You can use a cheese cloth or ordinary paper towels to remove the grout haze. You will see the grout lighten up to the expected color as it dries.
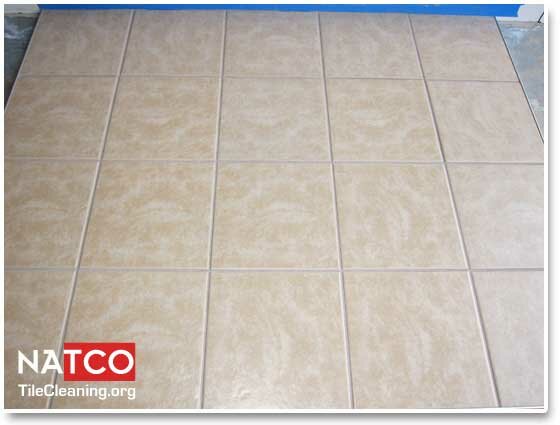
After grouting the tiles you should allow the grout to dry and set for at least 72 hours. You should then seal the grout to protect it and keep it looking clean and new looking. After the grout has been sealed then you should wait 24 hours before using your tile floor.
Grouting tile can be a difficult and time consuming job which also requires some practice and acquired skills. You may want to consider hiring a tile installation contractor to do your grouting job for you. You can read some valuable information here about how to hire a tile installation contractor.
comments powered by Disqus